
Effortlessly Set Up iCloud to Unlock the Full Potential of Your iPad
The iCloud ID is what lets you access so many features on your iPad. Your Apple ID, the nearly sacred portal to all of your data and pictures from iCloud storage (as well as notes, Find My iPad locations, syncing across devices via Continuity), apps like Apple Music and so much more. Many of the best features in using your iPad require an iCloud ID. This guide will show you how to get an iCloud ID on your iPad which gives you access to the whole of Apple’s great ecosystem.
Why You Need an iCloud ID
But before you learn how to create your iCloud ID, it’s vital first to get a good understanding of why one is so important. An iCloud ID was more than a login. It helps keep all of your devices in sync if you have other Apple products – like an iPhone, MacBook, or Apple Watch. Your photos, Videos., documents, and backups stored on iCloud will not only be safe but remain synced to the cloud & accessible anywhere Plus, iCloud is necessary for accessing services like Apple Pay, App Store purchases, and even FaceTime.
With all the best iPad Cyber Monday deals around, setting up a new iCloud ID can be intimidating for newer users and also those who’ve never had an iPad. Apple has done it simple and direct.
Step 1: Power On Your iPad
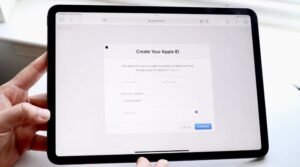
The first time you ever unbox your iPad, the setup will take care of walking you through making an iCloud ID In the case of an existing iPad, you can still create an iCloud ID but from your settings area. Start by turning on your iPad All you have to do is press the top button until an Apple logo appears at start-up
After turning it on, your iPad will prompt you to enter some basic details like your preferred language, region, and Wi-Fi network. If you already have an Apple ID, sign in; otherwise, select “Create Apple ID” to set up a new iCloud account.
Step 2: Provide Your Personal Information
Enter your personal details to make an iCloud ID The first few lines are just going to ask for your name and a birth date. Apple asks for this in order to comply with the minimum age requirement (usually 13 years), and provide you personalized services.
Be as precise on the details you enter since they will be tagged to your account. You will need this information anytime you forget your iCloud password to reset it. Then it will ask you version hence fill in the email. They already have a favorite email – ask them to enter that one. If not, Apple will allow you to make an iCloud address for free within the setup process.
Step 3: Create a Strong Password
You need to have a good password for your iCloud ID, it does all the work with the security of your account. Apple has some guidelines to make sure that your password is secure from the fakes out there. Your password has to be at least 8 characters long and include both numbers and letters with at least one capital letter.
A good strong password can save you from someone else logging into your iCloud account, especially if with the use of something like Safari Passwords > within iCloud KeyChain to store personal information such as credit card numbers etc.
After creating a password that Apple likes, take a good record of it. AppleProvided you have entered the passwords incorrectly at least once (and not pasted them) then this is a great option it will save your password as and when needed, but also auto-fill for the website whenever necessary.
Step 4: Verify Your Email
To finish the iCloud ID setup, you need to verify your email address if Apple. When you use an email that is already in use, Apple will send a verification code to this mail. But I had another instruction to follow: Check my email and wait for a six-digit passcode, then enter that into the iPad’s verification screen.
NOTE: If you selected to Create a new iCloud email address then this step will be skipped because the email is automatically verified. This email address is now linked to your Apple ID for all things purchases from the App Store, iCloud backups, and others.
Step 5: Set Up Two-Factor Authentication
Apple also provides two-step verification (2FA in brief). This feature means that if someone steals your iCloud password, they will not be able to access the same information from the domain of any Apple device. Ensure your phone number or another trusted device (such as Apple ID) to which the two-factor authentication is linked.
What happens is when you or anyone else tries to log into your iCloud account from any new device, then Apple sends a code to this trusted device. This is what you will need to type in order to enter the account. We recommend turning on this extra layer of security, especially if you keep anything sensitive in iCloud.
Step 6: Agree to Terms and Conditions
After the initial setup, you will be brought to a screen that asks if you agree or do not to Apple’s Terms and Conditions. As always, read through the terms if you are concerned with how Apple handles your data and services attached to your iCloud account. You will be asked to agree after reading the required information, tap on Agree.
Step 7: Configure iCloud Settings
It allows you to set up the behavior of iCloud on your iPad. Apps and Services: You can turn things off/on like iCloud Drive, Photos, Contacts, Calendars, etc.
To ensure you get automatic backups for your iPad, one of the things that must be done is to enable iCloud Backup. So even if anything goes wrong with your iPad, such as a damaged device or the worst loss of it all, you will also have that data safely stored in iCloud. When you get another device, you can restore everything from your iCloud backup.
Step 8: Explore Your iCloud Storage Options
With every iCloud account, 5 GB of mean-free storage is provided by Apple. Unfortunately, this might be too little for a lot of users who need to store lots of photos and videos even if only backups. Apple, on the other hand, provides several storage plans but ours is likely to be 50GB which it sells alongside 200 and 2TB. You can select a storage plan as per) your requirements and it is quite an upgrade or downgrade afterward.
To manage your iCloud storage, open Settings and click through [Your Name] > iCloud > Manage Storage. This is where you can see how full it is and sort by what’s taking up the space.
Conclusion: Enjoy the Full Apple Experience
Congratulations! At this point, you will have made your iCloud ID and might be able to use Apple’s complete list of services. iTunes ID to iCloud ID: An iCloud Account is capped with the capabilities that your iPad can do with it, from storing files in a secure place to syncing data between devices.
Now that your iCloud ID is up, remember to juice all the features in Apple’s universe from Find My iPad to iCloud Photos and beyond. To this end, the ownership of an iCloud ID is a must-have if you need to use your iPad well as anything from casual usage all the way through to professional.